Tips for Formatting Emails on Your Phone


Mobile Email Editor FAQ: Formatting on the Go

When you are writing emails on your phone, the format menu bar is hidden to give you more room to type. However, you can still easily format your text, create lists, and apply styles using standard mobile gestures and simple typing shortcuts.

📋 Formatting Shortcuts (Cheatsheet)

ActionHow to do it on Mobile
Bold TextSelect the text → Tap Bold (or B) in your phone’s popup menu.
Italic TextSelect the text → Tap Italics (or I) in your phone’s popup menu.
Bulleted ListType an asterisk (*) or a hyphen (-) followed by a space.
Numbered ListType 1. followed by a space.
Indent a List (Next Level)Press the Tab key on your virtual keyboard (if available) or type a space before your list shortcut.
Undo / RedoiPhone: Shake your phone or swipe left with three fingers.
Android: Tap the undo/redo arrows on your keyboard’s toolbar.

💬 Frequently Asked Questions

How do I bold or italicize text without a menu bar?

Instead of using keyboard shortcuts like Cmd + B, use your phone’s built-in text selection menu:

  1. Double-tap a word (or press and hold) to select it.
  2. Drag the handles to highlight the text you want to format.
  3. A menu bar will pop up right above the text (where “Copy/Paste” usually appears).
  4. Tap Format, BIU, or the three dots (More) to find the Bold or Italic options.

How do I start a bulleted or numbered list?

The editor recognizes smart typing shortcuts. Start a new line and type:

  • For Bullets: Type * or - and then press the Spacebar. The character will instantly turn into a bullet point.
  • For Numbers: Type 1. and then press the Spacebar.

How do I add another item to my list?

Just press the Return / Enter key on your mobile keyboard. A new bullet or the next number will automatically appear.

How do I finish my list and go back to normal typing?

When you are at the end of your list, press the Return / Enter key twice in a row. The empty bullet or number will disappear, and you can type regular paragraphs again.
ZeroPass – PSMail Mobile Apps

In the ongoing effort to reduce the risk of password usage, PSMail apps now support also ZeroPass our password less technology that is built using FIDO2 technology. If your phone supports this secure way of authentication you will be prompted to enable and use the Security Key (Android) or PassKey (iPhone) as a place to securely store your private key. Follow along to learn how to use this.

Continue reading ZeroPass – PSMail Mobile Apps

ZeroPass – Browser Login

PSMail’s ZeroPass technology works to provide you passwordless access to your account. This is done using the latest FIDO2 authentication framework. If your device supports a FIDO2 enabled browser , you can register the device to login without having to enter your password. The best available local authenticators – such as Biometric or local hardware keys (USB) – can safely store a private key that can be registered and used for passwordless login. Follow along to learn how

Continue reading ZeroPass – Browser Login

ZeroPass – Push Authentication

ZeroPass is a new feature we’re introducing  to your PSMail account that will enable you to  login to your account without the  need for a password. PSMail has featured the app PSMail2FA as a way for users to take advantage ofTwo-Factor Authentication (2FA) in securing their account. This same app now supports ZeroPass – a feature that uses push authentication to reduce the risks associated with traditional passwords. In addition to the app, the only other requirement is a mobile device that can support biometric authentication.

Continue reading ZeroPass – Push Authentication

PSMailbox app lock screen

PSMailbox app on Android and iPhone has an automatic lock that locks the app with a lock screen. The App can be unlocked using either your biometric (fingerprint, facial recognition) authentication or any local protection such as passcode you have on your mobile device. The default timeout for the app is 30 minutes. You can change the default timeout or disable the locking entirely

Continue reading PSMailbox app lock screen

Managing Email Groups and Subscribers

PSMail webmail allows you to create Groups which are distinct from List. Lists allow you greater flexibility in managing subscribers. But if you would like just a Group email address (essentially like Broadcast List in PSLists), then you can create one and manage the subscribers.

A Group allows you to bundle a number of recipients together. To create a Group, just visit https://mail.psmail.net/ login and then go to Contacts and the sub-menu of Group. A Group can have up to 500 subscribers. the subscribers are basically email addresses that are part of the Group. Group subscribers can be from your Individual Contacts, so you can recognize their friendly name stored in your Contacts rather than their email address.

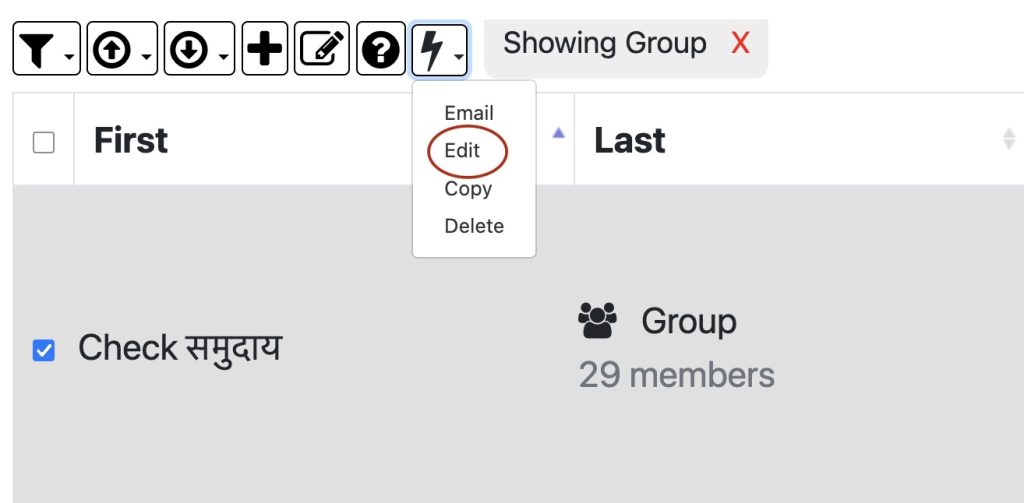
To edit a Group, click on the checkbox to the left of the row of the contact, then a new action icon will appear with options to Edit the Group as shown below.

Screenshot

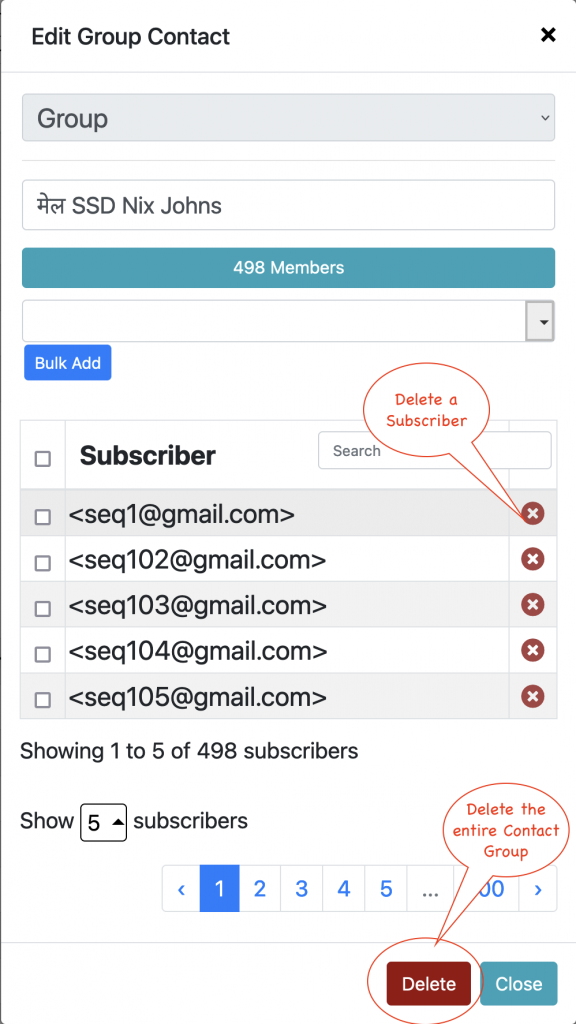
To delete a subscriber you can click on the “x” button next to a subscriber who is part of your Group. To delete the entire Group and remove all subscriber information, you can just click on the Delete button at the bottom. See image below for example.

Improving Your Workflow

Improving your email workflow with some helpful updates!

We’ve all done it. Probably more than once. You write out your email and carefully craft your explanation of the files or pictures you are attaching. Satisfied, you hit “send”…only to realize in a flash of frustration that you forgot to actually attach your attachments. Typically, it’s too late to fix this minor blunder. You’re forced to craft another email, apologetically explaining your mistake.

Continue reading Improving Your Workflow