It is convenient to send images and documents via email or share them using a file share. However, email size limits (typically 20 MBytes) keep you from sharing large documents. It is important to note that most doucments can be compressed to a smaller size without loosing content and quality.
Images such as photo images, pictures, and digital camera photos can be compressed to a size that is many times (40%) smaller without loosing quality. This is usually because pictures are stored in a large size and with very high quality to enable both editing and poster size printing if desired.
Here we provide some tips for compressing images, word documents, and power points for both MAC and Windows users. Linux users can take advantage of gimp which is powerful in manipulating images and compressing images/pictures to efficient transport formats.
Compression Tip for Windows User (Click here for MAC Users) [published from http://angel.wsu.edu/Tutorials/]
Check the file size as follows:
Right click the file and choose Properties from the right click menu.
File size is on the General tab. The exact locatiowinn varies depending on the version of Windows.
Microsoft Word and Powerpoint 2008 Documents:
There are two steps you can take to reduce the image size:
- Make the image smaller.
- Compress the image.
Making Images Smaller
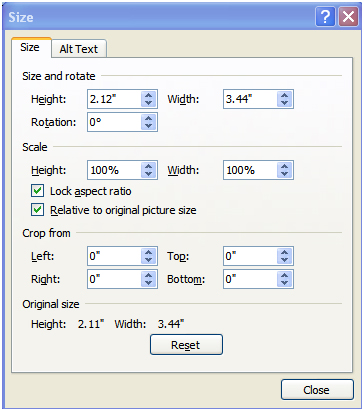
- Right click on the image and select Size from the right click menu.
- Select the Size tab.
- In the Size and rotate field, adjust the Height or Width options. Make sure to select “Lock aspect ratio” to adjust one setting and have the other auto adjust.
- Select Close to finish sizing the image.
Compress the Image File Size
- In Microsoft Word, select on the image you want to compress.
- Select Picture Tools located on the Word menu.
-

- Select Compress Pictures on the Picture Tools menu.
- In the Compress Pictures dialog box, check the Apply to selected pictures only checkbox (if you are only resizing one picture).
-
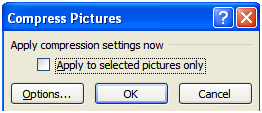
- Select OK. You have finished compressing your image.
PowerPoint version 2007:
- In PowerPoint, select the image you want to compress.
- Select Picture Tools located above the menu bar.

- Select Compress Pictures on the Picture Tools menu.
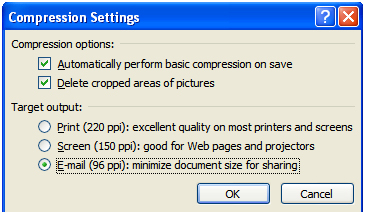
- In the Compress Pictures dialog box, select the Options button.
-

- In the Options dialog box, make sure the following are checked:
- · Automatically perform basic compression on save
- · Delete cropped areas of pictures
- Compression – Settings.png
- Under Target output select the appropriate option.
- Select OK. You are finished compressing your presentation.
PowerPoint versions prior to 2007:
- Open the PowerPoint presentation.
- Select File and then Save As.
- In the Save As dialog box, select the Tools dropdown menu.
- Select Compress Pictures.
- Select All Pictures in document.
- Select Web/Screen.
- Select Compress pictures and Delete cropped areas of pictures.
- Select OK. You are finished compressing your presentation.
Using and Uploading Images & Photos
Many images and photos start out with large file sizes, making it necessary to compress them before using them in a document. Microsoft provides a free tool for this called the Image Resizer that is available for download at http://www.microsoft.com/windowsxp/downloads/powertoys/xppowertoys.mspx .
The Image Resizer is very easy to use following these steps:
- Open the folder where your pictures are stored.
- Right-click on a picture that you want to resize and select the Resize Pictures option.
- In the Resize Pictures dialog box, select what size (small will work for most of your needs) you want your photo to be and then select OK. The original photo will still be available, but a resized version will also be available.
- For more information about the Image Resizer, please visit http://www.microsoft.com/windowsxp/using/digitalphotography/learnmore/tips/eschelman2.mspx.
Image Extension Types:
For those of you who are a little more technology savvy we have included more information on file extension types for images.
- BMP (Microsoft Windows Bitmap): Bitmap (BMP) is the standard Microsoft Windows raster file format that has no compression rate. Normally, it is not a very efficient format because it is not compressed, which makes it unsuitable for online use and increases the size of source PowerPoint files considerably.
- GIF (Graphics Interchange Format): If the image has fewer than 256 colors, GIF can render the image exactly. When the image contains many colors, the software that creates the GIF approximates the colors with the limited palette of 256 colors available. GIF is a very popular format due to its ability to animate using multiple layers and its support for transparency.
- JPEG (Joint Photographic Experts Group): JPG or JPEG works best for images with lots of subtle color variations, such as a photograph. It is not so suitable for graphics with areas of continuous color. It does not work so well on non-realistic images, such as cartoons or line drawings. It can contain millions of colors, but it does not support transparency. If you have any kind of image that has smooth, shaded transitions, in most cases JPEG is a better choice than GIF.
- PNG (Portable Network Graphics): PNG uses a lossless compression method (i.e., no degradation of image quality) like GIF. It has two formats, PNG-8, which supports up to 256 colors, and PNG-24, which supports millions of colors. PNG is of principal value if you have an image with large areas of exactly uniform color, but that contains more than 256 colors.
Compression Tip for MAC OS X Users
Option 1
Control+click the file and select Get Info.
Once this window opens, go to size under the General section.
Option 2
Go to the Apple toolbar and select File.
Go to Get Info.
Once this window opens, go to Size under the General section.
Microsoft Word Documents (2008)
If your file is greater than 10MB and contains images, you can make your images smaller in Word.
Making an Image Smaller
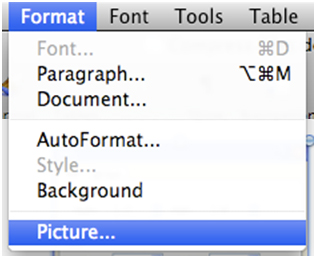
- Go to the Format menu and select Picture at the bottom of the menu.
-
- Select the Size tab.
- In the Size and rotate field, adjust the Height or Width options. Generally, you only need to adjust one setting and the other will auto adjust.
-

- Select OK to finish sizing the image.
PowerPoint Presentations
PowerPoint version 2007
- In PowerPoint, select the image you want to compress.
- Select Picture Tools located above the menu bar
-

- Select Compress Pictures on the Picture Tools menu.
-

- In the Compress Pictures dialog box, select the Options button.
- In the Options dialog box, make sure the following are checked:
- Automatically perform basic compression on save
- Delete cropped areas of pictures
- Under Target output select the appropriate option.
- Select OK. You are finished compressing your presentation.
PowerPoint versions prior to 2007
- Open the PowerPoint presentation.
- Select File and then Save As.
- In the Save As dialog box, select the Tools dropdown menu.
- Select Compress Pictures.
- Select All Pictures in document.
- Select Web/Screen.
- Select Compress pictures and Delete cropped areas of pictures.
- Select OK. You are finished compressing your presentation.
Using and Uploading Images & Photos
Many images and photos start out with large file sizes, making it necessary to compress them before using in a document. Mac OS X provides iPhoto, which has the tools necessary to complete this task.
To resize an image in iPhoto:
- Open iPhoto from your Applications folder.
- Go to the File Menu and select Import to Library.
- Use the Import dialog box to choose your image and select Import.
- Go to the File Menu and select Export.
- In the Export dialog box, select the Scale images no larger than: option on the left and enter in the dimensions you want your image to be exported as.
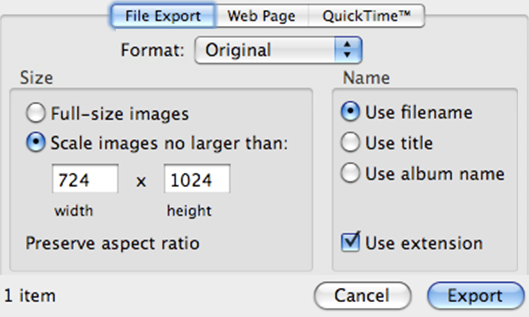
- Select Export and use the Save As dialog box to select the file name and destination you wish to save to.
- Select OK. Your image has been resized.