Note: All IMAP usage from October 2022 will require Device Password.
Step 1: Open iMail. Click Mail and then select Preferences from the drop-down menu.
Step 2: In the Accounts tab, add a new account by clicking the plus sign (+).
Step 3: For Full Name, enter your name. For Email Address, enter your PSMail address (ex. username@psmail.net). For Password, enter your PSMail password.
Step 4: Click Create.
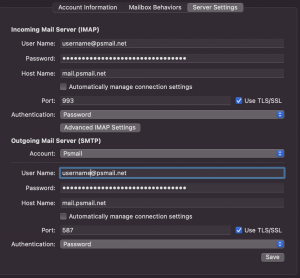
Step 5: For Incoming Mail Server, fill in the following information:
- Select IMAP for Account Type.
- Change the Incoming Mail Server to “mail.psmail.net”.
- Enter your PSMail address for User Name (ex. username@psmail.net).
- Enter your PSMail password for Password.
Step 6: Click Continue.
Step 7: For Outgoing Mail Server, fill in the following information:
- Change the Outgoing Mail Server to “mail.psmail.net.”
- Under Advanced Choose port to “465” with SSL*
- Select Use Authentication.
- Enter your PSMail address for User Name (ex. username@psmail.net).
- Enter your PSMail password for Password.
* This settings may require you to edit it later under outgoing/advanced options
Step 8: Click Continue and then Create. Your done!
Note: Disable the “Automatically manage connection settings” and manually choose the Port and the SSL/TLS Security to ensure reliable operation of your Mac Mail client through system upgrade. An example screenshot is shown below for convenience.